1. 功能验证
将出厂固件烧录进开发板,所有都例程都在/root/device_sample目录下
例程线上源码仓库:HiEuler/externed_device_sample
说明:例程线上源码仓库对每个例程都有详细的README.md
1.1. ADC
打开欧拉派的终端,并执行adc可执行程序
./adc #开始接收ADC引脚转换过来的数据,并打印在终端上显示
默认ADC引脚为1.8V,可通过杜邦线将ADC引脚与GND连接,连接后打印信息显示为0V左右
使用Ctrl+C结束接收
注意:引脚耐压值1.8V,禁止施加超过1.8V的电压
1.2. AUDIO
测试前将带麦克风的耳机接入开发板音频输入输出接口
export LD_LIBRARY_PATH=/usr/lib ld_liberary_path
cd /root/device_sample/audio
./audio_sample <index>
index and its function list below
  0:  start AI to AO loop
  1:  send audio frame to AENC channel from AI, save them		# 对麦克风讲话,将声音录下,保存为audio_chn0.aac文件
  2:  read audio stream from file, decode and send AO			# 播放audio_chn0.aac文件
  3:  read audio stream from Mydream44100.aac file, decode and send AO
  4:  start AI(VQE process), then send to AO
1.3. CAN
在开始测试前需要将can网卡节点开启,在欧拉派的终端上执行如下命令
ip link set can0 type can bitrate 500000
ip link set can0 up
TOF数据接收测试
使用 can_tof命令进行接收测试,在欧拉派的终端上执行
./can_tof
应用开启后持续接收TOF发送的距离数据并打印到欧拉派终端,使用ctrl+c结束接收
1.4. sample_hdmi
测试前将显示器和开发板用HDMI线连接好
export LD_LIBRARY_PATH=/usr/lib:/usr/lib64
cd /root/device_sample/hdmi
./sample_hdmi
hdmi_cmd:
   help                 list all command we provide
   q                    quit sample test
   hdmi_hdmi_force      force to hdmi output
   hdmi_dvi_force       force to enter dvi output mode
   hdmi_deepcolor       set video deepcolor mode
   hdmi_video_timing    set video output timing format
   hdmi_color_mode      set video color output(RGB/ycbcr)
   hdmi_aspectratio     set video aspectratio
   hdmi_a_freq          set audio output frequence
   hdmi_authmode        authmode enable or disable
1.5. sample_vio
vio中有其它许多选项,本次使用选项7测试4路IMX347摄像头
当前例程在板端/root/device_sample/mipi_vi目录下,以下命令需切换到该目录下执行。
usage : ./sample_vio <index>
index:
os08a20 24M 1080P60:
    (0) one sensor(i2c-5)         :vi one sensor (offline) -> vpss -> venc && vo.
    (1) one sensor(i2c-7)         :vi one sensor (offline) -> vpss -> venc && vo.
    (2) two sensor                :vi two sensor (offline) -> vpss -> venc && vo.
os08a20 24M 4K30:
    (3) one sensor(i2c-5)         :vi one sensor (offline) -> vpss -> venc && vo.
    (4) one sensor(i2c-7)         :vi one sensor (offline) -> vpss -> venc && vo.
    (5) two sensor                :vi two sensor (offline) -> vpss -> venc && vo.
imx347 37M 1080P30:
    (6) one sensor(i2c-7)         :vi one sensor (offline) -> vpss -> venc && vo.
    (7) four sensor               :vi one sensor (offline) -> vpss -> venc && vo.
imx485 37M 1080P60:
    (8) one sensor(i2c-5)         :vi one sensor (offline) -> vpss -> venc && vo.
    (9) one sensor(i2c-7)         :vi one sensor (offline) -> vpss -> venc && vo.
imx485 37M 4K30:
    (10) one sensor(i2c-5)         :vi one sensor (offline) -> vpss -> venc && vo.
    (11) one sensor(i2c-7)         :vi one sensor (offline) -> vpss -> venc && vo.
初始化
sensor运行需要进行复位和启动时钟等操作。执行下面的脚本完成摄像头的初始化
./scripts/init_imx347_4x2lan.sh
例程运行
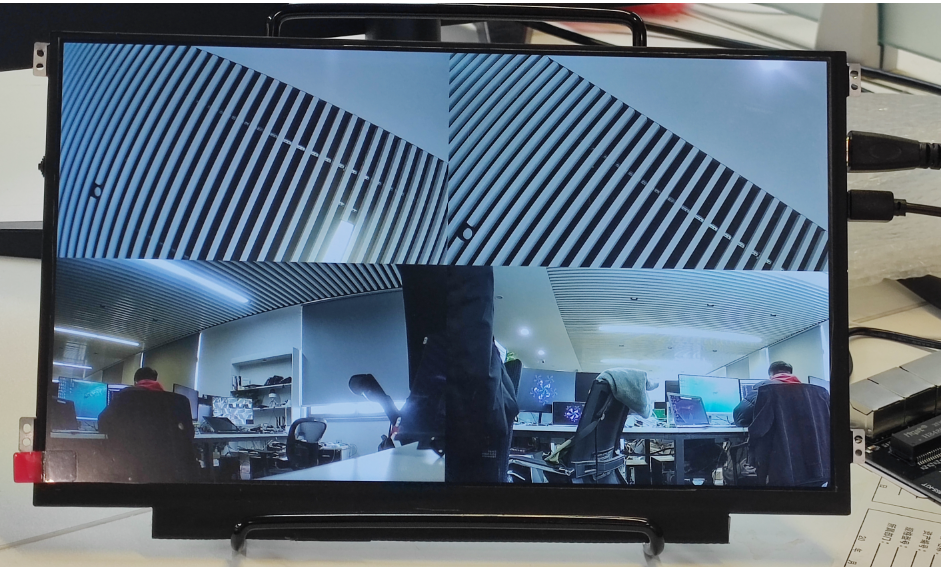
./sample_vio 7
执行完成后系统打印如下输出
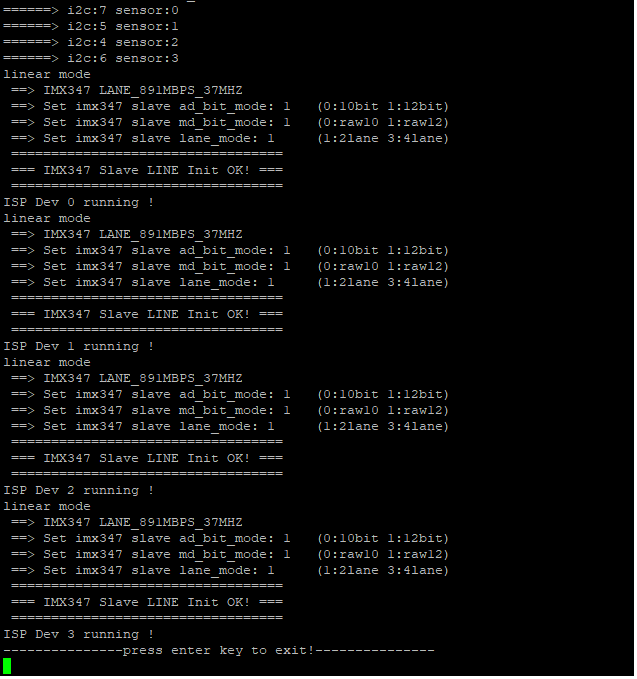
HDMI屏幕显示如下画面
1.6. sample_uvc
编译文件系统后可在/root/device_sample/路径下找到此文件
sd3403 ~/device_sample # ll
total 10464
-rwxr-xr-x 1 root root 5235120 Mar  9 12:34 sample_audio
-rwxr-xr-x 1 root root 2709528 Mar  9 12:34 sample_hdmi
-rwx------ 1 root root 2747096 Mar  9 12:54 sample_uvc
drwxr-xr-x 2 root root    4096 Mar  9 12:34 source_file
-rwxr-xr-x 1 root root   10224 Mar  9 12:34 test
sd3403 ~/device_sample #
执行
sd3403 ~/device_sample # ./sample_uvc
sample_uvc_usage: ./sample_uvc device [options]
supported options:
-f, --format format             set the video format
-F, --file[=name]               write file
-h, --help                      show help info
-s, --size WxH                  set the frame size (eg. 1920x1080)

inquire USB device format: ./sample_uvc /dev/video0 --enum-formats

example of setting USB device format:
    ./sample_uvc /dev/video0 -fH264  -s1920x1080 -Ftest.h264
    ./sample_uvc /dev/video0 -fH265  -s1920x1080 -Ftest.h265
    ./sample_uvc /dev/video0 -fMJPEG -s1920x1080 -Ftest.mjpg
    ./sample_uvc /dev/video0 -fYUYV  -s1920x1080 -Ftest.yuv
    ./sample_uvc /dev/video0 -fNV21  -s640x360   -Ftest.yuv

note: set macro MEDIA_WORK to 0 to write file on disk.

sd3403 ~/device_sample #
查看当前有几个USB摄像头设备
sd3403 ~/device_sample # ll /dev/video
video0  video1
查询当前USB摄像头支持的视频格式
sd3403 ~/device_sample # ./sample_uvc /dev/video0 --enum-formats
usb 3-1.1: reset high-speed USB device number 3 using xhci-hcd
Device /dev/video0 opened.
Device `HD Pro Webcam C920' on `usb-10320000.xhci_1-1.1' (driver 'uvcvideo') supports video, capture, without mplanes.
- Available formats:
        Format 0: YUYV (56595559)
        Type: Video capture (1)
        Name: YUYV 4:2:2
        Frame size: 640x480 (1/30, 1/24, 1/20, 1/15, 1/10, 2/15, 1/5)
        Frame size: 160x90 (1/30, 1/24, 1/20, 1/15, 1/10, 2/15, 1/5)
        Frame size: 160x120 (1/30, 1/24, 1/20, 1/15, 1/10, 2/15, 1/5)
        Frame size: 176x144 (1/30, 1/24, 1/20, 1/15, 1/10, 2/15, 1/5)
        Frame size: 320x180 (1/30, 1/24, 1/20, 1/15, 1/10, 2/15, 1/5)
        Frame size: 320x240 (1/30, 1/24, 1/20, 1/15, 1/10, 2/15, 1/5)
        Frame size: 352x288 (1/30, 1/24, 1/20, 1/15, 1/10, 2/15, 1/5)
        Frame size: 432x240 (1/30, 1/24, 1/20, 1/15, 1/10, 2/15, 1/5)
        Frame size: 640x360 (1/30, 1/24, 1/20, 1/15, 1/10, 2/15, 1/5)
        Frame size: 800x448 (1/30, 1/24, 1/20, 1/15, 1/10, 2/15, 1/5)
        Frame size: 800x600 (1/24, 1/20, 1/15, 1/10, 2/15, 1/5)
        Frame size: 864x480 (1/24, 1/20, 1/15, 1/10, 2/15, 1/5)
        Frame size: 960x720 (1/15, 1/10, 2/15, 1/5)
        Frame size: 1024x576 (1/15, 1/10, 2/15, 1/5)
        Frame size: 1280x720 (1/10, 2/15, 1/5)
        Frame size: 1600x896 (2/15, 1/5)
        Frame size: 1920x1080 (1/5)
        Frame size: 2560x1472 (1/2)

        Format 1: MJPEG (47504a4d)
        Type: Video capture (1)
        Name: Motion-JPEG
        Frame size: 640x480 (1/30, 1/24, 1/20, 1/15, 1/10, 2/15, 1/5)
        Frame size: 160x90 (1/30, 1/24, 1/20, 1/15, 1/10, 2/15, 1/5)
        Frame size: 160x120 (1/30, 1/24, 1/20, 1/15, 1/10, 2/15, 1/5)
        Frame size: 176x144 (1/30, 1/24, 1/20, 1/15, 1/10, 2/15, 1/5)
        Frame size: 320x180 (1/30, 1/24, 1/20, 1/15, 1/10, 2/15, 1/5)
        Frame size: 320x240 (1/30, 1/24, 1/20, 1/15, 1/10, 2/15, 1/5)
        Frame size: 352x288 (1/30, 1/24, 1/20, 1/15, 1/10, 2/15, 1/5)
        Frame size: 432x240 (1/30, 1/24, 1/20, 1/15, 1/10, 2/15, 1/5)
        Frame size: 640x360 (1/30, 1/24, 1/20, 1/15, 1/10, 2/15, 1/5)
        Frame size: 800x448 (1/30, 1/24, 1/20, 1/15, 1/10, 2/15, 1/5)
        Frame size: 800x600 (1/30, 1/24, 1/20, 1/15, 1/10, 2/15, 1/5)
        Frame size: 864x480 (1/30, 1/24, 1/20, 1/15, 1/10, 2/15, 1/5)
        Frame size: 960x720 (1/30, 1/24, 1/20, 1/15, 1/10, 2/15, 1/5)
        Frame size: 1024x576 (1/30, 1/24, 1/20, 1/15, 1/10, 2/15, 1/5)
        Frame size: 1280x720 (1/30, 1/24, 1/20, 1/15, 1/10, 2/15, 1/5)
        Frame size: 1600x896 (1/30, 1/24, 1/20, 1/15, 1/10, 2/15, 1/5)
        Frame size: 1920x1080 (1/30, 1/24, 1/20, 1/15, 1/10, 2/15, 1/5)

- Available inputs:
[sample_uvc_video_enum_inputs]-1811:    Input 0: Input 1.
[sample_uvc_video_enum_inputs]-1814:
video format: YUYV (56595559) 640x480 (stride 1280) field filed_none buffer size 0
Current frame rate: 1/30
Setting frame rate to: 1/25
Frame rate set: 1/24
sd3403 ~/device_sample #
插上HDMI显示器后根据当前摄像头支持的视频格式进行传参,可手动ctrl+c结束进程
sd3403 ~/device_sample # ./sample_uvc /dev/video0 -fMJPEG -s1280x720 -Ftest.mjpg
Device /dev/video0 opened.
Device `HD Pro Webcam C920' on `usb-10320000.xhci_1-1.1' (driver 'uvcvideo') supports video, capture, without mplanes.
- Available formats:
        Format 0: YUYV (56595559)
        Type: Video capture (1)
        Name: YUYV 4:2:2
        Frame size: 640x480 (1/30, 1/24, 1/20, 1/15, 1/10, 2/15, 1/5)
        Frame size: 160x90 (1/30, 1/24, 1/20, 1/15, 1/10, 2/15, 1/5)
        Frame size: 160x120 (1/30, 1/24, 1/20, 1/15, 1/10, 2/15, 1/5)
        Frame size: 176x144 (1/30, 1/24, 1/20, 1/15, 1/10, 2/15, 1/5)
        Frame size: 320x180 (1/30, 1/24, 1/20, 1/15, 1/10, 2/15, 1/5)
        Frame size: 320x240 (1/30, 1/24, 1/20, 1/15, 1/10, 2/15, 1/5)
        Frame size: 352x288 (1/30, 1/24, 1/20, 1/15, 1/10, 2/15, 1/5)
        Frame size: 432x240 (1/30, 1/24, 1/20, 1/15, 1/10, 2/15, 1/5)
        Frame size: 640x360 (1/30, 1/24, 1/20, 1/15, 1/10, 2/15, 1/5)
        Frame size: 800x448 (1/30, 1/24, 1/20, 1/15, 1/10, 2/15, 1/5)
        Frame size: 800x600 (1/24, 1/20, 1/15, 1/10, 2/15, 1/5)
        Frame size: 864x480 (1/24, 1/20, 1/15, 1/10, 2/15, 1/5)
        Frame size: 960x720 (1/15, 1/10, 2/15, 1/5)
        Frame size: 1024x576 (1/15, 1/10, 2/15, 1/5)
        Frame size: 1280x720 (1/10, 2/15, 1/5)
        Frame size: 1600x896 (2/15, 1/5)
        Frame size: 1920x1080 (1/5)
        Frame size: 2560x1472 (1/2)

        Format 1: MJPEG (47504a4d)
        Type: Video capture (1)
        Name: Motion-JPEG
        Frame size: 640x480 (1/30, 1/24, 1/20, 1/15, 1/10, 2/15, 1/5)
        Frame size: 160x90 (1/30, 1/24, 1/20, 1/15, 1/10, 2/15, 1/5)
        Frame size: 160x120 (1/30, 1/24, 1/20, 1/15, 1/10, 2/15, 1/5)
        Frame size: 176x144 (1/30, 1/24, 1/20, 1/15, 1/10, 2/15, 1/5)
        Frame size: 320x180 (1/30, 1/24, 1/20, 1/15, 1/10, 2/15, 1/5)
        Frame size: 320x240 (1/30, 1/24, 1/20, 1/15, 1/10, 2/15, 1/5)
        Frame size: 352x288 (1/30, 1/24, 1/20, 1/15, 1/10, 2/15, 1/5)
        Frame size: 432x240 (1/30, 1/24, 1/20, 1/15, 1/10, 2/15, 1/5)
        Frame size: 640x360 (1/30, 1/24, 1/20, 1/15, 1/10, 2/15, 1/5)
        Frame size: 800x448 (1/30, 1/24, 1/20, 1/15, 1/10, 2/15, 1/5)
        Frame size: 800x600 (1/30, 1/24, 1/20, 1/15, 1/10, 2/15, 1/5)
        Frame size: 864x480 (1/30, 1/24, 1/20, 1/15, 1/10, 2/15, 1/5)
        Frame size: 960x720 (1/30, 1/24, 1/20, 1/15, 1/10, 2/15, 1/5)
        Frame size: 1024x576 (1/30, 1/24, 1/20, 1/15, 1/10, 2/15, 1/5)
        Frame size: 1280x720 (1/30, 1/24, 1/20, 1/15, 1/10, 2/15, 1/5)
        Frame size: 1600x896 (1/30, 1/24, 1/20, 1/15, 1/10, 2/15, 1/5)
        Frame size: 1920x1080 (1/30, 1/24, 1/20, 1/15, 1/10, 2/15, 1/5)

- Available inputs:
[sample_uvc_video_enum_inputs]-1811:    Input 0: Input 1.
[sample_uvc_video_enum_inputs]-1814:
video format set: MJPEG (47504a4d) 1280x720 (stride 0) field filed_none buffer size 1843200
video format: MJPEG (47504a4d) 1280x720 (stride 0) field filed_none buffer size 1843200
Current frame rate: 1/30
Setting frame rate to: 1/25
Frame rate set: 1/24
8 buffers requested.
length: 1843200 offset: 0 timestamp type/source: monotonic/soe
Buffer 0/0 mapped at address 0x7f97e1e000.
length: 1843200 offset: 1843200 timestamp type/source: monotonic/soe
Buffer 1/0 mapped at address 0x7f97c5c000.
length: 1843200 offset: 3686400 timestamp type/source: monotonic/soe
Buffer 2/0 mapped at address 0x7f97a9a000.
length: 1843200 offset: 5529600 timestamp type/source: monotonic/soe
Buffer 3/0 mapped at address 0x7f978d8000.
length: 1843200 offset: 7372800 timestamp type/source: monotonic/soe
Buffer 4/0 mapped at address 0x7f97716000.
length: 1843200 offset: 9216000 timestamp type/source: monotonic/soe
Buffer 5/0 mapped at address 0x7f97554000.
length: 1843200 offset: 11059200 timestamp type/source: monotonic/soe
Buffer 6/0 mapped at address 0x7f97392000.
length: 1843200 offset: 12902400 timestamp type/source: monotonic/soe
Buffer 7/0 mapped at address 0x7f971d0000.
^C
media exit...
sd3403 ~/device_sample #
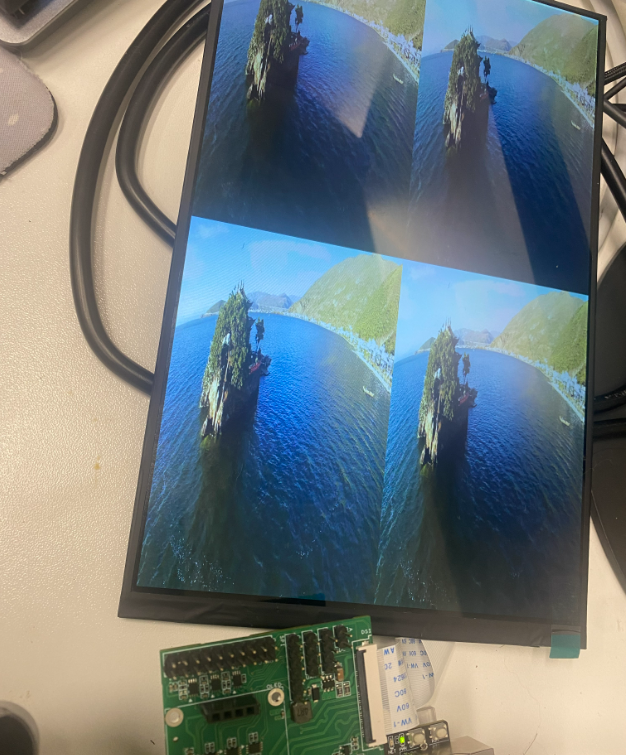
1.7. sample_mipi_vdec
测试前将显示器和开发板用mipi排线连接好
cd /root/device_sample/mipi_vdec
sd3403 ~ # ./sample_vdec 1920_1200.h265
start vo dhd0.
mipi intf sync = 48

_sample_test:press 'e' to exit; 'q' to query!;

  chn 0, stream file:1920_1200.h265, userbufsize: 3456000

  chn 1, stream file:1920_1200.h265, userbufsize: 3456000

  chn 2, stream file:1920_1200.h265, userbufsize: 3456000

  chn 3, stream file:1920_1200.h265, userbufsize: 3456000
q
 ---------------------------------------------------------------
 chn:0, type:265, start:1, decode_frames:17874, left_pics:0, left_bytes:0, left_frames:0, recv_frames:17874
 format_err:0,    pic_size_err_set:0,  stream_unsprt:0,  pack_err:0, set_pic_size_err:0,  ref_err_set:0,  pic_buf_size_err_set:0
 -----------------------------------------------------------------
 ---------------------------------------------------------------
 chn:1, type:265, start:1, decode_frames:17874, left_pics:0, left_bytes:0, left_frames:0, recv_frames:17874
 format_err:0,    pic_size_err_set:0,  stream_unsprt:0,  pack_err:0, set_pic_size_err:0,  ref_err_set:0,  pic_buf_size_err_set:0
 -----------------------------------------------------------------
 ---------------------------------------------------------------
 chn:2, type:265, start:1, decode_frames:17875, left_pics:0, left_bytes:0, left_frames:0, recv_frames:17875
 format_err:0,    pic_size_err_set:0,  stream_unsprt:0,  pack_err:0, set_pic_size_err:0,  ref_err_set:0,  pic_buf_size_err_set:0
 -----------------------------------------------------------------
 ---------------------------------------------------------------
 chn:3, type:265, start:1, decode_frames:17873, left_pics:0, left_bytes:0, left_frames:0, recv_frames:17873
 format_err:0,    pic_size_err_set:0,  stream_unsprt:0,  pack_err:0, set_pic_size_err:0,  ref_err_set:0,  pic_buf_size_err_set:0
 -----------------------------------------------------------------
mipi屏播放视频文件内容
1.7.1. 注意事项
如果开发板上电后如果MIPI屏幕背光不亮,请先检查接线,接线没问题可以设置gpio4
bspmm 0x0102F00E0 0x1200
echo 4 > /sys/class/gpio/export
echo out > /sys/class/gpio/gpio4/direction
echo 1 > /sys/class/gpio/gpio4/value
1.8. I2C
在开始测试前需检查oled驱动节点是否存在
ls /dev/oled*
oled显示屏显示ETH0网卡IP
ifconfig eth0 | grep -oP 'inet addr:\K\S+' | awk '{print $1}' >> "/dev/oled-0"
oled显示屏显示易百纳鲸鱼logo
./oled "/dev/oled-0" 1

1.9. PWM
进入欧拉派的终端,执行pwm程序
PWM_help:
./pwm <1> <2> <3> <4>
<1> be open or close to enable/disable PWM
<2> be 1 or 15 to chose PWM0_1 or PWM0_15
<3> be value for period
<3> be value for duty_cycle
示例一 开启舵机
将舵机与拓展板连接,并执行如下指令
./pwm open 1 20000000 2500000
舵机开始转动
示例二 关闭舵机
./pwm close 1
舵机停止转动
1.10. RS485
在开始测试前将RS485调试工具接到PC端,并在PC端打开串口调试工具
发送测试
使用rs485_senddata命令进行发送测试,在欧拉派的终端执行,通过RS485发送Hello World
./rs485_senddata /dev/ttyAMA3 115200 "Hello World"
发送后能在PC端的串口调试工具的软件中收到Hello World消息
接收测试
使用rs485_recvdata命令进行接收测试,在欧拉派的终端执行
./rs485_recvdata /dev/ttyAMA3 115200
应用开启后持续接收RS485总线上的消息并打印到欧拉派终端,在PC端发送数据可在欧拉派的终端收到。使用Ctrl+C结束接收
1.11. RTC
欧拉派上电后,打开串口终端,并执行如下命令
hwclock --set --date="2024-02-01 14:30:00" #该命令是用于设置RTC时钟

hwclock --hctosys #该命令是将RTC时钟同步到系统时钟
1.12. USB
U盘插入后将会打印相关信息
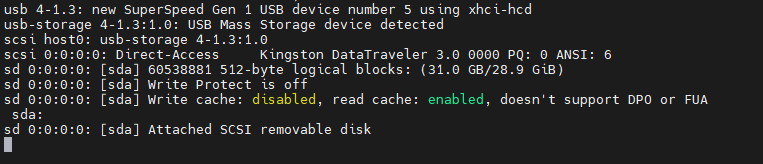
执行U盘分区并格式化为ext4文件系统格式
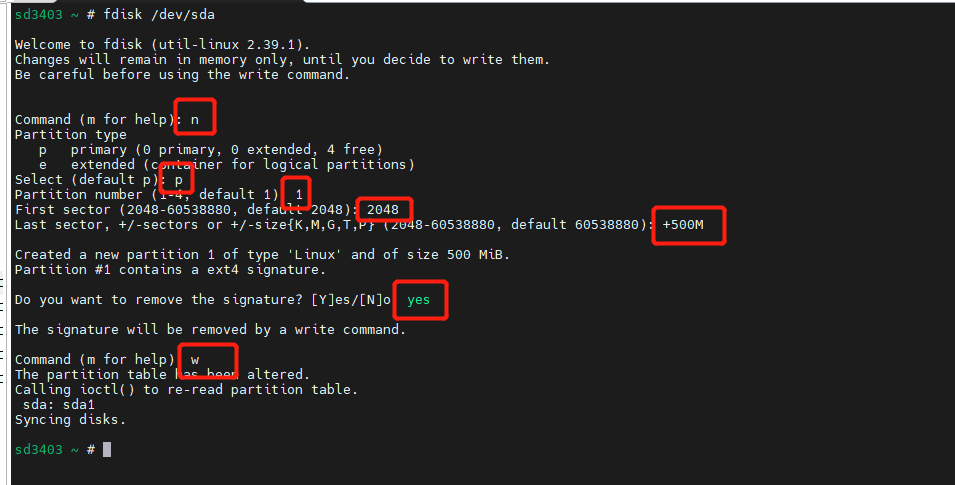
fdisk /dev/sda

注意:需要通过打印信息查看你自己的u盘节点是哪个,一般会在sd[a-z]之间,如果你的u盘节点是/dev/sdb,那么就执行fdisk /dev/sdb
按下图红框执行即可做出一个500M的分区 /dev/sda1
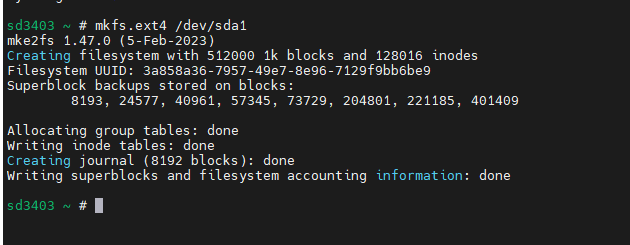
mkfs.ext4 /dev/sda1 #将刚刚做好的分区格式化为ext4格式
test_usb.sh 脚本用法:
./test_usb.sh <device_node> #参数为存储设备分区节点
Eg:
./test_usb.sh /dev/sda1
1.13. PCIE
出厂固件里的内核已将NVME硬盘驱动打开
PCIE硬盘不是热插拔设备,将PCIE硬盘接上后需要重启才能识别到设备
执行操作:
fdisk -l	# 查看PCIE硬盘是否被正确识别
mount /dev/nvme0n1p1 /mnt	# PCIE硬盘分区挂载到/mnt目录
dd if=/dev/zero of=/mnt/testfile bs=1M count=200	# 测试写入速度
dd if=/mnt/testfile of=/dev/null bs=1M		# 测试读取速度
umount /mnt		# 解挂载
1.14. TF
出厂固件里的内核已将TF卡动打开,插上会打印信息
执行操作:
fdisk -l	# 查看TF卡是否被正确识别
mount /dev/mmcblk1p1 /mnt	# TF卡分区挂载到/mnt目录
dd if=/dev/zero of=/mnt/testfile bs=1M count=200	# 测试写入速度
dd if=/mnt/testfile of=/dev/null bs=1M		# 测试读取速度
umount /mnt		# 解挂载